CLICK HERE FOR FREE BLOGGER TEMPLATES, LINK BUTTONS AND MORE! »

Sunday, October 27, 2013

Devotion For The Day

1 Timothy 2:5-6 (NIV) 5For there is one God and one mediator between God and men, the man Christ Jesus, 6who gave himself as a ransom for all men–the testimony given in its proper time.

Man always tries to step into the role that is reserved for Christ alone. Fortune telling, speaking to the dead, or any other means of trying to commune with God other than through Christ Jesus are all subverting the role of our one mediator. Cult leaders steal this role with devastating consequences to those who allow them to do so. God wants to speak personally with you through His Son.

Under the Old Covenant, the prophet and priest stood in this intervening place. Because the Spirit of God was not poured out to all men, those who had the Spirit upon them spoke in the place of God. Though the gift of pr...ophecy is in the church today, the office of prophet ceased with John the Baptist (Luke 16:16). Now that the Spirit is poured out, we are all called to be priests. We can all come boldly to the throne of grace. The Spirit can speak directly to us. You don't need a prophet to tell you what God is saying for your mediator is Christ alone. The gift of prophecy may confirm what the Spirit is speaking to your heart, but it is not the infallible word of God. We are to test all prophecy to see that it lines up with the Word. The Word has been made flesh, Jesus, our mediator.

What a wonderful mediator we have! If you are in trouble with another person, you want someone who is impartial, yet, you want someone who has your best interest at heart. Sin makes us all in trouble with God, yet our mediator, Christ Jesus, is ever present before God, interceding on our behalf. You couldn't ask for a better mediator. He paid our debt for us so that we could be right with the Father. Now He mediates our prayer requests. He intercedes for our spiritual growth. He presents requests according to the perfect will of God in order that we might be found faultless at the Day of Christ.

Consider: Jesus is the only Mediator that God accepts. He is the One that shares the Father's heart. Thank the Father for providing the perfect mediator.
See More
Saturday, October 26, 2013

Devotion Of The Day

1 Timothy 1:14-16 (NIV) 14The grace of our Lord was poured out on me abundantly, along with the faith and love that are in Christ Jesus. 15Here is a trustworthy saying that deserves full acceptance: Christ Jesus came into the world to save sinners–of whom I am the worst. 16But for that very reason I was shown mercy so that in me, the worst of sinners, Christ Jesus might display his unlimited patience as an example for those who would believe on him and receive eternal life.

Paul considered himself to be a trophy of God's grace. His letters to Timothy were among his last letters written. Early on in his ministry he described himself as the least of the Apostles (1 Corinthians 15:9). Midway into his ministry he said he was the least of all God's people (Ephesians 3:8). Here at the end of hi...s ministry he declares himself to be the worst sinner.

Maturing in Christ means an increasing revelation of our sinfulness. At first we don't see ourselves as being so bad. We know we are in need of Jesus, but we almost think God made a good choice when He picked us. As we grow, the Spirit reveals more and more of our pride and selfishness. We start to wonder why God would choose us. Then, as our revelation of His holiness increases, we realize that we are the worst of sinners. We start to see that it is all about His glorious grace. He takes the worst and transforms them into the image of His Son. What an amazing God! How else could we understand how gracious and merciful He is?

Paul said God does this so that we can see His unlimited patience. I thank God for His unlimited patience! Everyone that sees a saint in progress should be attracted to the gracious loving God that would even choose that person.

Consider: Where are you in the process of the revelation of your condition without Christ? Has humility become your robe, attracting those who see it to the gracious God that is doing the work in you? Every transformed life is a testimony to unbelievers that God can save them too.
See More

Friday, October 25, 2013

Pumpkin 101

How To Roast A Sugar Pumpkin & Make Fresh Pumpkin Purée – A Step-by-step Photo Tutorial

how to roast a pumpkin 48801   How To Roast A Sugar Pumpkin & Make Fresh Pumpkin Purée – A Step by step Photo Tutorial
I unofficially deem this Sugar Pumpkin Week here on Oh She Glows. No wait, make that officially!
I’m not talking canned pumpkin this week.
I’m certainly not talking large carving pumpkins this week.
But sweet, cute-as-a-button sugar pumpkins. The ones that started showing up quite early in my grocery store at the end of August (thank you Organic Garage!). Often just 2-4 pounds, sugar pumpkins (also known as pie pumpkins or pumpkin pie squash) are sweeter than larger carving pumpkins, making them perfect for all of your favourite pumpkin dishes. Their flesh is also firmer and less stringy than carving pumpkins.
My goals for this week are to show you how simple it is to prepare a sugar pumpkin whether its roasting, puréeing, toasting the seeds, or making recipes. It’s really much easier and faster than you might think (at least it was for me!) and it’s nice to take a break from canned pumpkin once in a while. The flavour of a fresh roasted pumpkin is quite different from the canned variety; it’s a bit earthier and nuttier, not to mention so buttery when roasted. A side-by-side taste comparison of canned pumpkin versus freshly roasted pumpkin will make your head explode. It’s definitely worth the extra work now and then.
I hope my photos will inspire you to try it out for yourself if you haven’t already done so. For the pumpkin pros out there, feel free to share you favourite tips and recipes in the comments. If you can’t find a pie pumpkin in your area yet, feel free to try this with butternut squash. The roasting process is pretty much the same and the outcome is just as delicious.
All set?
how to roast a pumpkin 4915   How To Roast A Sugar Pumpkin & Make Fresh Pumpkin Purée – A Step by step Photo Tutorial

Roasting 101:

1. Preheat the oven to 350F and grab small 2-3 pound sugar pumpkin(s). I like to roast a couple 2-lb. pumpkins at the same time. Remember – we’re not looking for the huge carving pumpkins here.
First things first, sharpen your knife! You don’t want to use a dull knife on any squash…or food for that matter. 
2. Slice the stem off before slicing in half so you don’t have to slice through the stem.
how to make pumpkin puree 5048   How To Roast A Sugar Pumpkin & Make Fresh Pumpkin Purée – A Step by step Photo Tutorial
I forgot to in this photo below, but it’s much easier when you remove the top! Some people prefer to slice off both ends and then peel the entire pumpkin before roasting, but I find it easier to peel the skin after roasting – much like with roasted beets.
3. Slice in half.
how to roast a pumpkin 4886   How To Roast A Sugar Pumpkin & Make Fresh Pumpkin Purée – A Step by step Photo Tutorial   how to roast a pumpkin 4892   How To Roast A Sugar Pumpkin & Make Fresh Pumpkin Purée – A Step by step Photo Tutorial
4. With a sharp-edged spoon (I use a metal tablespoon with a sharp edge or you can use a metal ice cream scoop), scoop out the seeds & guts. Make sure you clean & save the seeds for roasting. I’ll show you my favourite way to roast the seeds coming up in a future post. Whatever you do, do not throw them out!
how to roast a pumpkin 4895   How To Roast A Sugar Pumpkin & Make Fresh Pumpkin Purée – A Step by step Photo Tutorial
5. Brush inside with oil (optional, but I like to) and place face down on baking sheet lined with parchment paper. I roasted two 1.9-lb. sugar pumpkins. They are so tiny and could all fit on my roasting pan!
how to make pumpkin puree 5051   How To Roast A Sugar Pumpkin & Make Fresh Pumpkin Purée – A Step by step Photo Tutorial
6. Roast at 350F for about 45-50 minutes. The exact time will vary depending on the size of the pumpkin(s) and you may need more time. The skin will be slightly darker and you should be able to poke a fork quite easily through (see image below).
Here is my pumpkin ready to come out of the oven. As you can see, the skin is a deep orange, slightly wrinkled, and my fork could easily slide through.
how to make pumpkin puree 5052   How To Roast A Sugar Pumpkin & Make Fresh Pumpkin Purée – A Step by step Photo Tutorial
6b) I could not resist sticking my fork in and tasting my first (very hot) bite. YUM!! If you want to stop here, just give it a good sprinkling of Herbamare and freshly ground black pepper. Then dig in!
how to roast a pumpkin 4914   How To Roast A Sugar Pumpkin & Make Fresh Pumpkin Purée – A Step by step Photo Tutorial
7. Let the pumpkin cool for 10 minutes before handling. Grab a large spoon and peel away the very thin skin. It comes off almost effortlessly. At this point, you can use the flesh in all kinds of dishes – soups, casseroles, risotto, pies, etc.
Steamy!
how to make pumpkin puree 5053   How To Roast A Sugar Pumpkin & Make Fresh Pumpkin Purée – A Step by step Photo Tutorial
Into the compost goes the skin. Unless you’re Eric, you might put it in a smoothie…(I joke, I joke).
how to make pumpkin puree 5066   How To Roast A Sugar Pumpkin & Make Fresh Pumpkin Purée – A Step by step Photo Tutorial
Today, I decided to make pumpkin puree for a recipe I was planning (hint #1!).
8. If making a puree: Place the pumpkin flesh into the blender and blend away until super smooth. I used my tamper stick on the Vitamix to push all the pumpkin down until it got going. Let it go for a good minute or two – you don’t want any clumps left.
The result was out of this world – so smooth and buttery!
how to make pumpkin puree 5063   How To Roast A Sugar Pumpkin & Make Fresh Pumpkin Purée – A Step by step Photo Tutorial
3.8 pounds of pumpkin (weighed before roasting) made 4-4.5 cups of pumpkin puree. Not too shabby at all! As a rule of thumb, 1 small sugar pumpkin should make enough puree to equal one 15-oz. can.
At this point you can drain the pureed pumpkin in a cheesecloth to remove excess water or you can use it as is. I didn’t bother draining it because I knew I’d be cooking it down for the recipe (hint #2!).
Whatever you do – be sure to save the seeds for roasting.
Coming up – the recipe I used my pumpkin puree for and my favourite way to roast pumpkin seeds.
What’s your favourite way to enjoy fresh pumpkin?


Read more: http://ohsheglows.com/2012/09/10/how-to-roast-a-sugar-pumpkin-make-fresh-pumpkin-puree-a-step-by-step-photo-tutorial/#ixzz2iksDOFDC

Chit chat around the table..

What is everybody doing today?.. Its sunny 44 feels great..Hope to get garlic in and some plants along with digging more Taters..

Devotion For The Day

2 Thessalonians 2:9-11 (NIV) 9The coming of the lawless one will be in accordance with the work of Satan displayed in all kinds of counterfeit miracles, signs and wonders, 10and in every sort of evil that deceives those who are perishing. They perish because they refused to love the truth and so be saved. 11For this reason God sends them a powerful delusion so that they will believe the lie...

The Thessalonians were concerned that perhaps they had missed the Second Coming of Christ. Paul told them that there would be a falling away first and that the man of sin would be revealed. Then he went on to tell them what that would be like. He called him the lawless one and said that Satan would work to produce counterfeit miracles, signs and wonders. He will work in such a way as to give those w...ho refuse the truth something to believe in. This method has always been at work, but it will reach a crescendo before Christ's return.

If people refuse the truth, God sends them a powerful delusion so that they will believe the lie. To believe in and love the truth and become a son or daughter of God is a wonderful privilege. Those who refuse to do so, those who reject the gift of salvation, will be given something they can believe in.

It happens today in a less obvious way. There are many false religions that allow you to remain on the throne of your life and yet give you a false sense of spiritual growth. These religions are based on pride and selfishness. Man desires to cling to these two vices more than any other. Satan has custom designed lies that feed these desires. Those who refuse to love the truth readily accept them.

It can also happen in small ways in the believer's life. When the Spirit points out an area we have not given over to the lordship of Christ, we can make excuses and even come up with reasons why it is alright to stay in control. God allows this for a time, but in every believer He will continue to confront it until we face the truth.

Consider: Those who refused to love the truth will accept deception. Those who love the truth will be shown the areas in their thought life that are still in error.
See More
God Bless Have a wonderful Day...

Wednesday, October 23, 2013

Searching the Scriptures (Food for thought)

Lets Bake


Cupcake Mixology

Cupcake mixologyI thought it would be fun to show you how I get the most mileage out of my favorite cupcake recipes. It's easy to customize a basic recipe that you trust and love with a few simply add-ins, creating more treats with less work. This is a great tip for anyone looking to impress guests at their next party or for a bake sale. I'm going to show you how I used 2 basic cupcake recipes (vanilla and chocolate) and 1 frosting recipe to create six different flavor combinations!
Cupcakes made: 
1. PB & J cupcakes
2. Homemade Hostess cupcakes
3. Marmalade Dream cupcakes
4. Peanut Butter Monster cupcakes
5. Classic Party cupcakes 
6. Cinnamon Sugar cupcakes
Cupcake mixology 2

Simple Vanilla Cupcakes makes 1 dozen
Most of the recipes are taken from HERE!

Needed: 2 1/2 cups flour, 2 cups sugar, 2 teaspoons baking soda, 1/2 teaspoon salt, 2 cups water, 2/3 cup oil, 1/2 teaspoon vanilla extract and 2 tablespoons vinegar. (Note: this cupcake recipe is vegan friendly!)


In a bowl whisk together the dry ingredients. In another bowl mix together the wet ingredients. Combine these and stir just until no lumps are left. Pour the batter into a lined cupcake pan and bake at 350 F for 22-25 minutes.


Simple Chocolate Cupcakes makes 1 dozen


Needed: 2 1/4 cups flour, 1/4 cup cocoa, 2 cups sugar, 2 teaspoons baking soda, 1/2 teaspoon salt, 2 cups water, 2/3 cup oil, 1/4 teaspoon vanilla extract and 2 tablespoons vinegar. (Note: this cupcake recipe is vegan friendly!)

In a bowl whisk together the dry ingredients. In another bowl mix together the wet ingredients. Combine these and stir just until no lumps are left. Pour the batter into a lined cupcake pan and bake at 350 F for 22-25 minutes.

Simple Butter Cream Frosting makes about 2 1/2 cups

Needed: 4 sticks of softened butter (2 cups), 1/4 teaspoon vanilla extract (the clear kind is better for frostings) and 2-3 cups powdered sugar.

In a bowl cream together the butter and vanilla extract. Add the powdered sugar, 1 cup at a time, and mixing in between until you have the perfect frosting consistency.

Now that you have the basic recipes we can mix them up to make all our flavor combinations!


1. PB & J cupcakes- vanilla cupcake base. Use a sharp knife to carve a small (inverted) pyramid out of the center, fill with jam or jelly (I used Blue Chair Damson Jam). Now take 1 cup of your butter cream frosting and stir in 1/3 cup peanut butter. Pipe the peanut butter frosting over the top.


2. Homemade Hostess cupcakes- chocolate cupcake base. Use a sharp knife to carve a small (inverted) pyramid out of the center, fill with marshmallow cream. Pipe marshmallow cream over the top.


3. Marmalade Dream cupcakes- vanilla cupcake base. Use a sharp knife to carve a small (inverted) pyramid out of the center, fill with marmalade (I used Blue Chair Orange-Kumquat Marmalade). Top with marshmallow cream, toast in the broiler for a few seconds if you like.


4. Peanut Butter Monster cupcakes- chocolate cupcake base. Pipe on peanut butter frosting (see flavor #1) and top with chopped peanut butter cups!


5. Classic Party cupcakes- chocolate cupcake base. Top with classic butter cream and sprinkle on some pretty sprinkles.

6. Cinnamon Sugar cupcakes- vanilla cupcake base. Top with classic butter cream and sprinkle on a little cinnamon and sanding sugar.

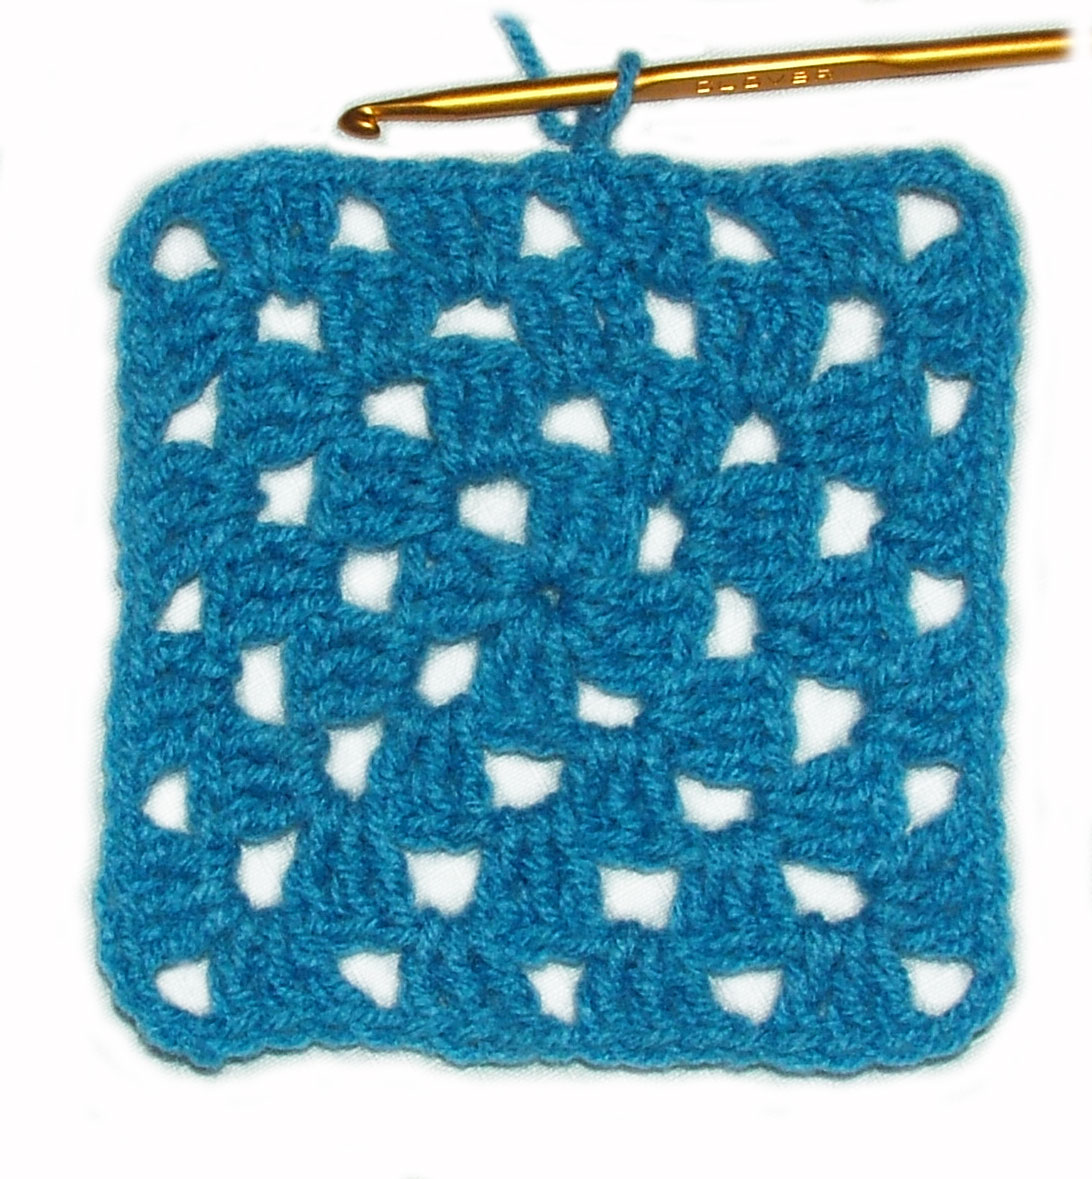
Its Granny Square time.. Come join the fun

http://rensfibreart.wordpress.com/2patterns-2/the-humble-granny-square/

The Humble Granny Square

The following instructions are for the easiest & most consistent One colour Granny Square that I know &, although there are many variations, this is the one I use because I know my squares will be square & the corners open & even &, no matter how many rounds are I work, the square stays flat without ruffling or pulling in…..
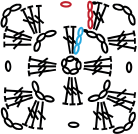
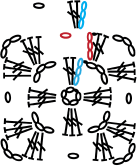
The instructions are in written form & I have also included stitch drawings & stitch diagrams (for those of you who would like to learn how to read pattern graphs)…..
For your first attempts I recommend working in a light coloured 8 ply (US worsted) yarn & using the hook size you are comfortable with –  4.50 (US 6/G) or 5.00 (US 8/H)
Stitch Diagram Symbols

One Colour Granny Square:

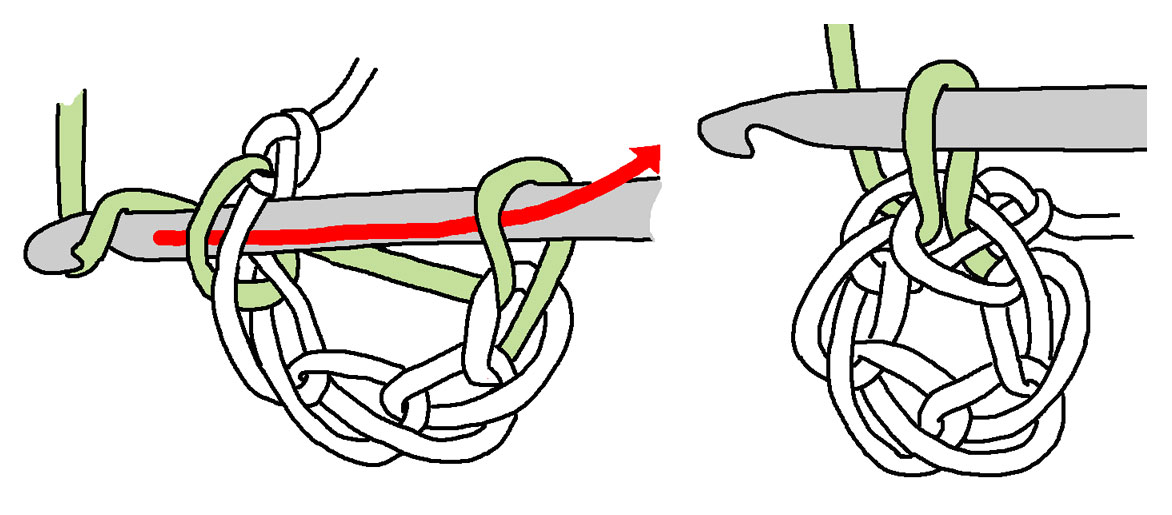
Foundation Ring:
begin by making 5 chains (ch), join with a slip stitch (ss) to the 5th ch from hook to form a ring,

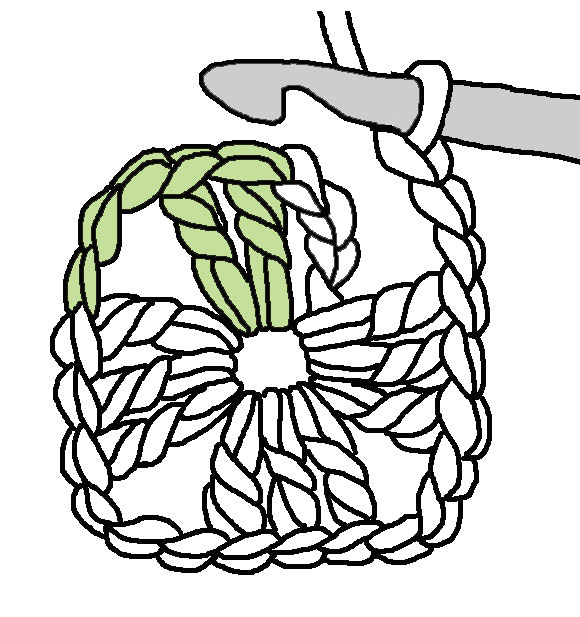
Round 1:
1) make 3 ch ((beginning ch) count this 3 ch as your first tr (US dc) of this round & throughout the entire pattern) & for this round you will be working into the ring

2) into ring work (2 tr (US dc), 3 ch) once,

3) then, continue working into ring, make (3 tr (US dc), 3 ch) three times,

4) join with ss into top of beginning ch (3rd ch of beginnging ch) – this join completes the first shell of round.
you should have - 4 shells = 12 tr (US dc) & 4 x 3-ch spaces (sps)

~~~~~~~~~~~~
Round 2:
1) make 4 ch ((beginning ch) count this 4 ch as your first tr (US dc) plus 1 ch of this round & throughout the entire pattern)

2) then * in the next 3-ch sp work (3 tr (US dc), 3 ch, 3 tr(US dc), 1 ch), repeat from * around to last 3-ch sp,

3) in last 3-ch sp work (3tr (US dc), 3 ch, 2 tr (US dc))

4) join with ss to 3rd ch of beginning ch – this join completes the last shell of round
you should have – 8 shells = 24 tr (US dc) – 4 x 3-ch sps – 4 x 1-ch sps

~~~~~~~~~~~~
Round 3:
1) make 3 ch, then into same sp work (2 tr (US dc), 1 ch), you have made the first shell of this round


2) in next corner sp work * (3 tr, 3 ch, 3 tr, 1 ch),


3) in next 1-ch sp work (3 tr, 1 ch),

4) now, repeat from * around to beginning ch, join with ss to top of beginning ch (3rd ch of beginnging ch) – this join completes the first shell of round
you should have 12 shells = 36 tr (US dc) – 4 x 3-ch sps -8 x 1-ch sps

~~~~~~~~~~~~
Round 4:
1) make 4 ch

2) in the next 1-ch sp work (3 tr (US dc), 1 ch),

3) * in the next 3-ch sp work (3 tr (US dc), 3 ch, 3 tr (US dc), 1 ch),

4) then in each next 1-ch sp work (3 tr (US dc), 1 ch), repeat from * around to last 1-ch sp,

5) in last 1-ch sp work (2 tr (US dc))

6) join with ss to 3rd ch of beginning ch – this join completes the last shell of round
you should have – 16 shells = 48 tr(US dc) – 4 x 3-ch sps – 12 x 1-ch sps

Rounds 3 & 4 are the repeat rounds, but you can finish off on any round or just keep going to any desired size
~~~~~~~~~~~~~~~~~~~~~~~~~~~~~~~~~~~~~

Adding colours to your Granny Square:

The following drawings shows colour changes on every round… however, how many rounds per colour you work is entirely up to you – experiment with these colour changes & amaze yourself with the creativity you may never have thought you had….
Basically you follow the above instructions except that you finish off each colour round before starting a new colour round
~~~~~~~~~~~~
1) Bring in your new colour in any 3-ch sp with a slip stitch & make 3 ch ((beginning ch) count this 3 ch as your first tr (US dc) of this round & throughout the pattern), in the same space work (2tr (US dc), 3 ch, 3 tr (US dc)),
Tip: leave generous tail ends & wherever possible work over tail ends as you work
2) then, depending on the round, work as for one colour Gr/square instructions
~~~~~~~~~~~~~~~~~~~~~~~~~~~~~~~~~~~~~

Edging your Granny Square: is entirely optional but personally, I prefer to work 2 rounds of dc (US sc) around each square mainly because the squares look more finished & they are so much easier to join into projects later – the main thing to remember when edging your square is to work your dc (US sc) stitch for stitch across to corner stitches & you must work 3 dc (US sc) in each corner stitch.

There are many variations, but the following the 2 methods  are the ones I use most often for edging Granny Squares:
Example No 1. Round 1:
1a) after finishing your last round with a slip stitch do not finish off but continue with this last colour in use (working colour) & make 1 ch, & dc (US sc) in same stitch,

1b) now * work dc (US sc) in each 1-ch space & in each stitch across to next 3-ch space, work 3 dc (US sc) in 3-ch space, then repeat from * around & join with a slip stitch to the first dc (US sc) but do not finish off
Tip: I like to place a marker in the middle stitch of the 3 corner stitches for easy identification on the next round & I leave these markers in so that when it comes to joining my squares later I only have to match them corner marker to corner marker

~~~~~~~~~~
Example No 1. Round 2:
1c) make 1 ch, & dc (US sc) in same stitch,

1d) now * work dc (US sc) in each stitch across to next middle corner stitch, work 3 dc (US sc) in middle corner stitch, then repeat from * around & join with a slip stitch to the first dc (US sc) & finish off

~~~~~~~~~~~~~~~~~~~~~~~~~~~~~~~~~~~~~
Example No 2. Round 1:
2a) finish off your last colour of square & bring in your new colour with a dc (US sc) in any corner 3-ch space, work 2 dc in same space (this makes your first 3-corner stitches)
Tip: joining with a dc (US sc) – start with the slip knot on hook, insert hook into space indicated by pattern & draw up a loop (2 loops on hook), YO & draw through both loops on hook (this counts as the first dc (US sc)) then continue as pattern instruction

2b) now * work dc (US sc) in each stitch & in each 1-ch space across to next 3-ch space, work 3 dc (US sc) in 3-ch space, then repeat from * around & join with a slip stitch to the first dc (US sc) but do not finish off
Tip: I like to place a marker in the middle stitch of the 3 corner stitches for easy identification on the next round & I leave these markers in so that when it comes to joining my squares later I only have to match them corner marker to corner marker

~~~~~~~~~~
Example No 2. Round 2:
2c) make 1 ch, & dc (US sc) in same stitch,

2d) now * work dc (US sc) in each stitch across to next middle corner stitch, work 3 dc (US sc) in middle corner stitch, then repeat from * around & join with a slip stitch to the first dc (US sc) & finish off

~~~~~~~~~~~~~~~~~~~~~~~~~~~~~~~~~~~~~
Congratulations! you have completed your Granny Square…  once you have made a few more you will need to join them & make what ever your heart desires – you will find a number of different ways of joining your squares on the Joining New Yarn, Fabric, Squares & Motifs page – enjoy!