Thought this would be fun.. Enjoy..
This is a document written in flux. I'm still experimenting even as we speak (1 June 1999), and as I figure more things out, they will be reflected on this page. Quite a lot of this material is an attempt at reconciling conflicting reports on how to cut a quill. People are of many opinions, but the material's the real test. This is just another account of experience and materials.
This is a page about how to cut feathers into useful quill pens. It attempts to go into most of the tradeoffs and possibilities that are possible with one of the most flexible writing instruments ever made. A practical guide to making feathers into something that writes.
I won't say that if you follow The Instructions Here that you'll get a working pen to your liking, half the battle is really knowing what you like. The other half is getting a feel for how your knife goes into the feathers of your choice and how the various things I'm going to talk about will affect what you really want to do. I will say up front that it's probably going to take a number of tries, it won't be perfect the first time, but with practice it can be really statisfying.
I'm going to cover
equipment,
prep,
cutting, and then
re-cutting of nibs in this page.
Equipment
This is the stuff I use to cut quills.

1. Feathers
First, a bit about feathers. How many people have actually held out the wing of a very large dead bird, measured the three or four longest feathers and pulled them out? Any takers? I know I have never seen a dead goose or turkey wing with feathers still on it. So the old adage about taking the longest three feathers off the wing is all very good when you're Thomas Jefferson and can raise your own geese simply for their quills; but for us modern types there is a much simpler way to gather feathers.
I buy my feathers from local Hobby Lobby, Ben Franklin, or even Michael's; and whatever hobby shop that's filled with odd baskets, dried flowers, leather lacing, candles galore, and beads is the place to hunt down feathers. I've seen these kinds of shops all over the Seattle area, the San Diego area and the Denver area, so I'm assuming that they're accessible from all over the U.S.. I have no clue what international equivalents are, but would be glad to list them here if someone tells me.
Usually they have bags of 'Indian Feathers' (made in China or Taiwan or whatever) with about six feathers for about a buck and a quarter, so they're about a quarter apiece for usable quill feathers. The usable ones don't have a crushed tube and do have a significant portion of nearly transparent tubing underneath the plume of the feather. I've actually had some bad luck finding a majority of usable feathers in the packets at Michael's, so try the others if you can, first.
Above is a picture with one of the average feathers I've found by a ruler so you have some idea of minimum length and tube thickness. I usually go for almost a foot long feathers and the tube is usually 3/16 to a 1/4 inch thick. I don't like using stuff that's much smaller than this. Tales of raven feathers and the like being usable are true, but these are a good, standard, cheap starting place. Next to it is one of the feathers with a crushed tube, and you can also see that the tube is significantly smaller than the regular feather.

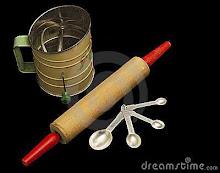
2. The Knife
Above the crushed tube is my knife. It's a
Benchmade 875 with the blue titanium liners that
Trip gave to me for a birthday. It's the knife I use for pretty much all my quill cutting. It's got a 3.75 inch ATS-34 blade of 59-61 HRC hardness with a .12 inch thickness and a plain edge, no sawtooth. It fits my hand well and, surprisingly, does the fine detailed work very easily. The edge is magnificent and cuts very nicely without any slippage or misses.
I also bought one of the 330's, because I wanted something small, but it just doesn't have the stability the bigger knife has, the only differences are that it's .8 inches thick and far shorter. So I have no idea why it doesn't cut raw quill material as well. It does cut, but my control isn't as good with the smaller blade and with all the microscopic adjustments I like to make, I prefer using the larger knife. The 875 goes through the stuff easily, the 330 makes it a bit more work. I have some hope that the tempered tubes may make the 330 more useful.
I have used a little, tiny Swiss Army pen knife (funny how pen knives are good for cutting pens), you know, those tiny pocket knifes with a toothpick and tweezers that always get lost? I sharpened it with a diamond knife sharpening stone, and it's good for getting the membrane out. It even has a built-in scissors to start the shaping of the tines and to finish the tip with, so it's actually a fairly good thing to use if it can be sharpened enough to cut neatly. It is harder to use than either of the above knives; however, it is significantly cheaper.
The knife should be clean, extra sharp to prevent slippage and accidents, and have a flat, none-edged back near the handle for scraping certain bits clean. I'm fairly sure that even a good kitchen knife should be able to do the job, but make sure that it has smooth edges, not serrated. A XACTO knife, straight razor, or a scapel can also work; but they're all much harder to control because of the lack of control surface.
They say that in the old days, folks kept a penknife solely for the usage of cutting quills, and that it was kept wicked sharp and never used for anything else, even scraping parchment to erase a mistake. Some say that the curved tip is shaped to make cutting the curved edges of the tines more easily, but I've never used anything but the base of the edge because I've found the tube material too tough to just press and cut, I've mostly had to just carve the tips into the right shape.
3. Other Stuff
The other two items are make the process much easier. I use the tweezers for pulling the dried membrane out of the center of the feather, and I use the scissors both to shape the nib and to finish the very tip. For the initial shaping, to make sure that I don't completely mess up the tines by pushing really hard on them with a knife, I have to have a pair of very sharp sewing scissors to snip away the worst of the extra material on either side of the tip.
Resharpening doesn't really need either of these additional tools, as the knife tip can take a bit of membrane out of the center and the knife edge is very good for doing the relatively small amount of material removal needed to just reshape the tip, rather than re-cutting it from scratch.
Preparation
Preparation is not totally necessary, you can just
go and cut the tube of the feather without either of these techniques as outlined in the cutting area. But tempering will give the nib a longer usage life as well as certain properties that dictate how you can cut the pen further down the tube. It is also a fun and weird experiment in materials science. The stripping portion simply gives a more usable shaft that also looks good and is easier on the hand.
1. Tempering
Tempering gives the tube resilience and toughness. There are two paths that I've gone down with this technique and the two of them give different results and different material strengths. They also alter cutting technique on the tube, and I'll outline the difference for the different tubes when I get down there.
Both methods involve putting a can full of sand into a toaster oven (or regular oven) at 350 degrees Fahrenheit for about fifteen to twenty minutes and then pushing the shaft of the feather as far into it as it will go. I presently use a soup can filled with sand, as that will cover all the bare area of the feather shaft. I leave it in until the sand gets cold. I used to use a tuna can, the idea is the same, the full, sixteen ounce cans allow me to do this just once, instead of once for the tip and once further up when I get that far up with the cutting.

The methods of splitting and cutting that I first outline are for a shaft that has been just heat treated. And what happens is that the transparent tube goes opaque from the heat and it gets both harder and more brittle, so that the splitting technique outlined below works really well and the point stays around for a good four to six pages. The top shaft, below, has been just heat treated, and the bottom one is how it looks before it's been treated at all. The tube should shrink a little, feel more solid than the untreated tube. It also allows recutting by simply splitting the split a bit further and recutting the tip.

The second technique for tempering involves *first* soaking the bare shaft in water overnight. The transparent tube goes opaque with the soaking. Then stick it in the hot sand, and it will go transparent again after the long heat treatment in the hot sand. The tube from this treatment will be just as tough as the just-heat treated tube, but it will be less brittle and more flexible. It also becomes nearly impossible to split in the normal order of cutting.
This actually lines up with historic data that indicates that only four or five good points could be gotten from a quill, as without being able to just further the split, the split has to be restarted *opposite* the original tip. So re-tipping this kind of tube has an entirely different set of steps once the original split has been used up.
The flexibility of the tube, though, after both water and heat treatment is marvelous for writing, and the tube material seems to take as long to wear as with the more brittle just heat treated hardness without sacrificing flexibility. It's a trade off in many ways. The one thing is that with the heat-only method, I've had a fairly significant number of tube just shatter when I tried to cut them. That might more than make up for the length of tube that gets cut for points on the more reslient tube.
There are a few other methods of tempering that I've heard of or tried and discarded. One is putting a can of sand on a burner on the stove, and that's one that I haven't tried or wanted to try or even feel there's a need to try. As the person who does do this regularly says that it's imperative to watch the feathers so that they don't burn. It seems non-useful and more dangerous than I need. The tempering that's done just in the hot sand *out* of the heat source seems to be plenty and there's no risk of burns or burning the tubes. I've also avoided fire, ashes, and direct applications of fire or heat sources.
I have tried tempering nibs after they've been cut, but every single one had the tines split further from each other, rendering the tip pretty much non-functioning. Another I've tried is using a hair dryer, but the heat isn't even enough and the tube shrinks unevenly. Not a good thing.
2. Stripping
There are a number of ways to strip your feathers. This is mostly the removal of the plume to get it out of the way of the writer's hand. The bare minimum is to strip off the lowest barbs and as much as is necessary to clear a space for the hand. Just use the edge of the knife and carefully scrape the bits of plume away until the shaft underneath is smooth.
There's a cool company that makes quills for
Pendemonium that I would actually recommend. They do a stripped Elizabethen/Shakespearian quill that is a marvel of construction. The problem with the ones I recieved, though, were fairly minor, but I had to fix them a little to get them to really write without splattering ink everywhere. I had to broaden the tip just a bit. They weren't tempered as much as I temper mine, which may not have been an oversight as what they did is adequate for one time use; and they'd actually cut the tip the wrong way for the way the feather curved. At least for how I'm comfortable holding, using and writing with a quill. The slit, however, was really nice, and the curvature was a very good thing to study of how they'd cut the tines. The beauty of them, though, was in the stripping of some really strong feathers. They'd taken one side completely off. The other side has this magical cut edge that's very smooth and strong. Every time I cut the plume just away from the shaft, I can never get it that smooth. I would definitely recommend these quills if you really don't want to cut them yourself, and at $10 for two, it's cheap compared to anything else I've seen.
I also did a thing where I left the narrow edge and just used scissors to cut along the line of the rib to take off the majority of the larger plume, just to get it out of the way. I've also just stripped of all of the larger half of the plume, it's clean and neat. It is easier to cut from the tip of the feather towards the root/nib end using scissors. It is easier to go the other way when using a knife to strip it clean. The picture shows the minimum in the middle, the commercial prep on top, and then my ragged utility quill on the bottom.

Where the plume starts has a vein that runs a channel into the tube, so nearly everything in the area where the plume starts is unusable for nib work and pens. So it doesn't really matter too much if it gets scarred or if it even gets cut off. So long as the remaining length is comfortable for your hand.
Cutting the First Nib
My main emphasis is on very fine tipped quill pens, things that I can use to write four or five lines of text at a time. With tempering, they can last for several pages per sharpening as well. The main order is make the slit first, then shape the two tines to meet where the slit is. For those that want the reslience of soak-then-heat read
this first. For the rest of you this is what I do:
- Find pen orientation -- Hold the feather is you would a pen. I've found that the best thing is to follow the curve so that the point curves down instead of up. When it curves up and there's a bead of ink under the nib, if the angle is too low, the bead can touch the paper and spread everywhere. Also, the shape of the quill under the plume may affect how easy it is to hold. So figure out where the top of the pen should be.
 It will actually work with the opposite curve, it's just a bit more awkward to get it to work easily, sometimes, though some folks like the way the tube curves through their grip the other way, so it's worth trying.
- Cut to set-up Slitting -- This is an entirely non-intuitive cut. But, starting from the top, if you're holding the point away from you, cut a steep angled cut away from you. Try and make this as centered as possible on where you want the top to be. This should cut all the way through the tube and should be less than forty-five degrees steep. Yes, you're making exactly the opposite cut you would if you were going to make the tip in one cut and slit it. The picture may help. I've marked the 'top' of this feather with a black marker and show the angle of the cut. It is the bottom of the two shafts.

- Open the Tube -- A shallow cut along the bottom, centered against the top, it should be fairly long and can be nicely curved so that by the time you get to the tip, you should be cutting off about half the width of the tube in a nice, level line. It's to open the tube up for the next steps.
It should look like the top tube in the picture above.
- Making the Slit -- This is the tricky bit. Take the two 'horns' that are shaped by the intersection of the small cut and the big cut and fold them together and press that part of the tube flat. You should hear a snap and a split should appear between the 'horns'. Try not to make it too long a slit, that is, don't fold the opened section of tube too far away from the tip. You want something that's only a quarter of an inch long, but if it's longer, don't worry. It's easy to just cut that shallow cut further to accomidate the slit length.
An alternate and even trickier procedure for making the slit is, before you open the tube, put the tip of the knife into the small hole made by the initial cut and lever the knife to make a very little slit in the bottom of that initial round. A good picture for this bit can be seen at this U.K. recreation page, on step three of their process. I've never been able to do this without cutting an inch-long gash in the length of the tube in crazy directions. It may just take practice, but I've also never had a knife-cut split work as well as a split that used the nature of the tube material to make a clean split.
Museum back up to my method appears on the backs of some pen knives in the shape of a peg that the tip was pressed against in order to make and lengthen the slit by splitting the tube material further.
- Shaping the Nib -- There is a tradeoff of angles and strength and how long the nib's tip will last. The answer to the problem is in the curved shape. This is part of why most fountain pen nibs are shaped the way they are, to give strength at the base, strength used to stablize the whole nib and keep the slit together, and flexibility and narrowness at the tip of the tines to provide a narrow writing point.
If the nib is too wide, it'll dull quickly. If the nib is too narrow, it'll flick ink everywhere and wear down very quickly. So I shape each tine wide at the base, narrow at the tip with my scissors (so I don't push too hard at the initial tine and snap it off by using a knife) and then carve away, slowly, with a knife to make the curve as shown in the center. The one on the left is cut with too narrow a tip and is the commercial one that flicks ink in all directions. The tip on the right is cut too widely and is actually just a tip that I've done the scissors work to but not carved to shape, yet.
 The tines don't have to be identical. I've had a few slits slide to one side on me when split, and I've had one tine larger than the other, but things still worked. I tried to correct on the next cutting and that helped significantly. One thing to be sure of, though, is that both sides end up with material that will hit the paper on either side of the slit.
The other function of the shape of the nib is for ink flow. The tip needs to be flat, whereas the part of the quill that holds ink needs to be rounded to make best usage of ink's surface tension abilities. If the curve and surface area extends too far down the tip, the ink will flow too quickly to the tip, ending up in blobby writing and a tendency for the tip to drop a lot of ink at once. The picture below shows the shape of the shaped nib from the side. This is the other why as to why the material is carved away from the sides.
 I also try to shape the nib so that the tip meets up right, i.e. both tine tips meet at exactly the same spot on the central slit. This takes some really fine shaving at the end of the shaping and a lot of looking at the result to see if it actually ends up right. With practice, it gets easier to see and easier to judge. In the beginning, though, I had to ink a lot of useless tips before I could figure out the really tiny bits of adjusting that needed to be done to get it to really work.
- Finishing the Tip -- I usually do the shaping of the tines to where they meet as exactly as possible at the same point on the tip, which usually ends up being a needle-like tip, with small curls of shavings still attached and when they pull off there's microscopic 'bits' on it still. To remove the bits, I usually put just the very edge of the tip into the scissors and snip the loose or unstable bits off, this is sometimes about the thickness of an eyelash.
The traditional way, though is to put the tip on some supporting surface, the easiest when I'm holding knife in the right hand and pen in the left is my left index fingernail, and then use the knife to cut off the last infintesmal bit. To make a thicker nib, cut off more. Medium, broad, and even chisel points are easy, just cut them to that shape with the slit in the middle. As another step with the boarder tips is scraping either the top or the bottom a bit to make a smoother tip for writing. This is much like grinding smooth any metal tip, just faster.
This is really hard to get a picture of because the work is just so close and so microscopic. I actually find it easier to do this without my contacts in because I'm severely nearsighted, to the point where I have such a strong prescription for everyday use that my really close sight gets affected when I have my lenses in. I can do a general shaping with my contacts in, but the occassional troublesome point takes me taking out my contacts to actually figure out the microscopic adjustment to get it right.
- Testing Your Point -- The final step is to dip it into ink and try it out on some paper. Make sure that you have good paper, cheap paper will take the amounts of ink that a quill puts down and bleed the ink everywhere, even amounts of ink that shouldn't bleed and are normal for a quill. Also, try to use a fairly light hand, it shouldn't be ridiculously light, but it shouldn't be three-copies-through-carbon-paper heavy, either, as that's bound to split the tips. I've found, though, if the tip is cut correctly and the nib is stable, someone with a pretty heavy hand can still write with a well-cut quill.
Most usual problem at this point is that it's spilling ink in big blobs everywhere. This usually means that the edges defining the tines weren't curved from the outside to the tip so that the tip are could be flat for enough surface area. What usually happens is that they aren't cut curved, just straight, so that there is curve to the tube as well as more width just behind the point. The width allows more ink flow to the tip than the tip can actually handle, and the surface tension of the ink clings to the curve until it touches down to the paper. Then blob. The fix is to cut the tip so that, from the side it looks like the picture first up from here.
A less usual problem, but one that happens once one gets the idea to shape the tip thinly, is that of flicking sprays of ink in some direction. Usually this means that the tip was shaped too thinly, without enough support from the base of the tines. So slice just a bit off the tip, to allow it a bit wider a base.
Finally, if it writes for four or five words and then quits, it's because the feed from the ink reserve isn't working and either the split really isn't a split or the tines aren't meeting evenly on the paper, and you might be writing with just one tine. I know it *looks* like it is, but it's possible that the split slants through the material or something really small isn't quite lined up. Look at it under a magnifying glass or just shave a bit off each side of the tip and re-cut your tip and it may well work better. Another manifestation of this is when one tip is just barely off, and some letters might fade out as your write, but if you change the angle you're holding the pen at, the writing comes back. One way to check the split is to see if ink gets in it when you've dipped it and wiped the rest of it clean. The other, more dangerous way, is to use the knife edge to just gently lift up on the split to see if the tips really do part. If you do this too far, the tips may never come back together and you have to re-cut it anyway; but sometimes it can be a very useful way to see if things are working.
Points about cutting -- The knife isn't a press and cut kind of deal, where the tip is pressed against the tube material and it actually goes through. I usually carve, shaving off bits and curls from the outside in along the tine shaping bits. The first two cuts are also nearly the same as whittling motions, where the knife edge catches on the surface, then slices or carve through material. I do a lot of tiny, little carvings at the end. The shallow cut and the steep cut at the beginning are quick and ruthless; but the shaping is a very fine control thing.
For Soaked and Tempered Tubes -- The soaked and tempered tips need a slightly scrambled order, and the only way to split the tube is by
using your knife. So basically, it's do the
set-up cut, make
the knife split, then
open the tube to
shape the tines, and finish by
cutting the tip. With the more flexible material, the knife split is actually easy to do.
Back to cutting start.
Cutting Subsequent Nibs
For the just-heat treated tubes there are four steps to cutting the next nib after the first point is worn down and it's good practice for getting the shape right on the tips. Basically, lengthen the split, lengthen the open part of the tube, reshape the tines, and recut the tip.
- Lengthen the Split -- First, if the split is longer than the length from the tip to the base of your tines (i.e. the outmost flare of the tines), you may not have to do this at all, just go on to the next step and just sharpen the point.
If you have to split it further just fold the two tines against each other, folding parallel to the length of the tube and around the insides. There should be a snap and the split should be lengthened. Try to keep the pressure as close to the point as possible, to keep the split length relatively small.

- Lengthen the Open Tube -- The shallow cut along the bottom of the tip should be lengthened, just dig the edge of the knife into the tube about as much further on as you've lengthened the slit, and do the shallow cut again. Take about half the width of the tube off by the time you've hit the corners of the old nib. If you haven't lengthened the split at all, just take off as much as you want to take off the point, which may be as little as another shaving on either side, or may be as much as cutting off both shoulders to the tines and reshaping them from that.
- Reshape the Tines -- First, following the curvature of the previous nib, cut the sides again, remembering to cut the curve so that the tip is flattened out sufficiently. I usually take the corners off the outside of each tine and then shape up towards the tip from the new 'corner', trying to cut in early and then smooth towards the tip.
- Reshape the Tip -- Just as before, when the tines are shaped well enough, then shape the tip by cutting off the tip even to either side of the slit.
For the soak and heat treated tubes, if you don't need to lengthen the split at all, just go through steps 2 through 4. If you have to make a longer slit, it's actually easier to slit the curved end of the shallow cut, i.e. on the opposite side of the tube from the original point than to make a clean split by folding the tube. The split is done as the original split was done, with the knife tip in the tube, but with the edge on the opposite side, and using the leverage to crack what was once the curved edge on the lower side. So, make the slit, then cut a new shallow tube opener opposite that slit, effectively taking off the entire old nib, and then shape the tines to either side of the completely new nib and make the point as usual.
This will make the tube curve the other way in your hand; but it allows for a very clean, quick slit for the new nib. Amusingly enough, this also lines up with some historic data that a large goose feather was only good for four or five nibs before it should be thrown out. With the just-heat technique, I can get nearly an infinite number of tips from it so long as I just keep lengthening the slit in a controlled manner.
http://www.flick.com/~liralen/quills/quills.html