http://rensfibreart.wordpress.com/2patterns-2/the-humble-granny-square/
The Humble Granny Square
The following instructions are for the easiest & most consistent One colour Granny Square that I know &, although there are many variations, this is the one I use because I know my squares will be square & the corners open & even &, no matter how many rounds are I work, the square stays flat without ruffling or pulling in…..
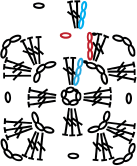
The instructions are in written form & I have also included stitch drawings & stitch diagrams (for those of you who would like to learn how to read pattern graphs)…..
For your first attempts I recommend working in a light coloured 8 ply (US worsted) yarn & using the hook size you are comfortable with – 4.50 (US 6/G) or 5.00 (US 8/H)
One Colour Granny Square:
Foundation Ring:
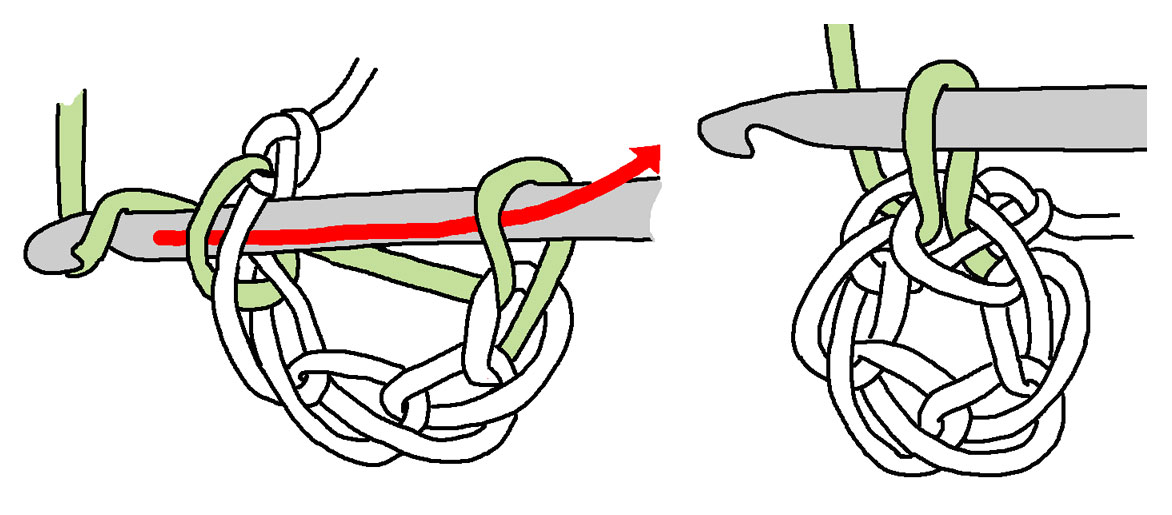
begin by making 5 chains (ch), join with a slip stitch (ss) to the 5th ch from hook to form a ring,

Round 1:
1) make 3 ch ((beginning ch) count this 3 ch as your first tr (US dc) of this round & throughout the entire pattern) & for this round you will be working into the ring


2) into ring work (2 tr (US dc), 3 ch) once,

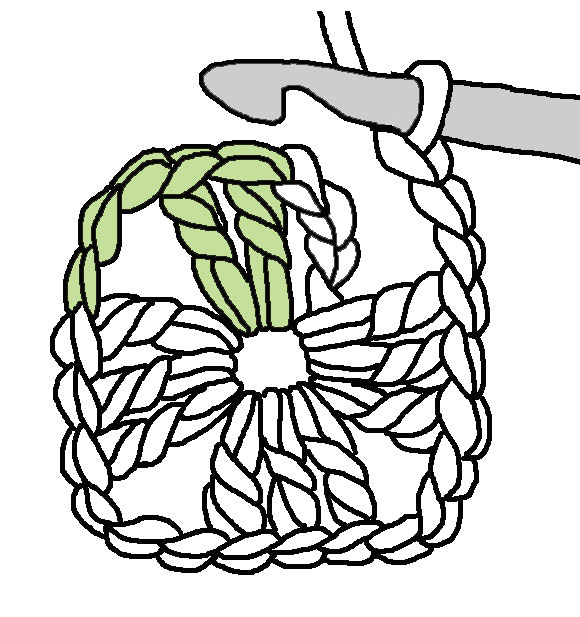
3) then, continue working into ring, make (3 tr (US dc), 3 ch) three times,


4) join with ss into top of beginning ch (3rd ch of beginnging ch) – this join completes the first shell of round.
you should have - 4 shells = 12 tr (US dc) & 4 x 3-ch spaces (sps)


1) make 4 ch ((beginning ch) count this 4 ch as your first tr (US dc) plus 1 ch of this round & throughout the entire pattern)


2) then * in the next 3-ch sp work (3 tr (US dc), 3 ch, 3 tr(US dc), 1 ch), repeat from * around to last 3-ch sp,
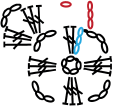

3) in last 3-ch sp work (3tr (US dc), 3 ch, 2 tr (US dc))


4) join with ss to 3rd ch of beginning ch – this join completes the last shell of round
you should have – 8 shells = 24 tr (US dc) – 4 x 3-ch sps – 4 x 1-ch sps
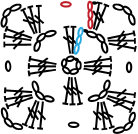

1) make 3 ch, then into same sp work (2 tr (US dc), 1 ch), you have made the first shell of this round


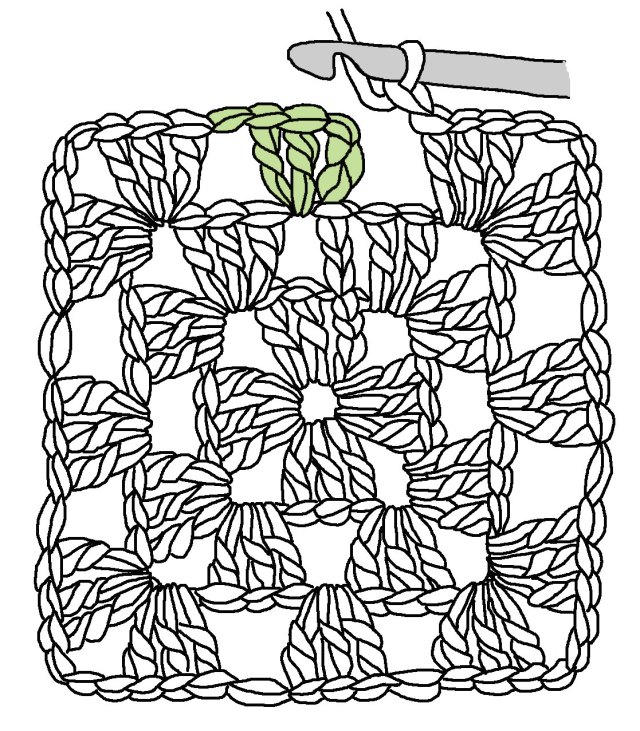
2) in next corner sp work * (3 tr, 3 ch, 3 tr, 1 ch),


3) in next 1-ch sp work (3 tr, 1 ch),

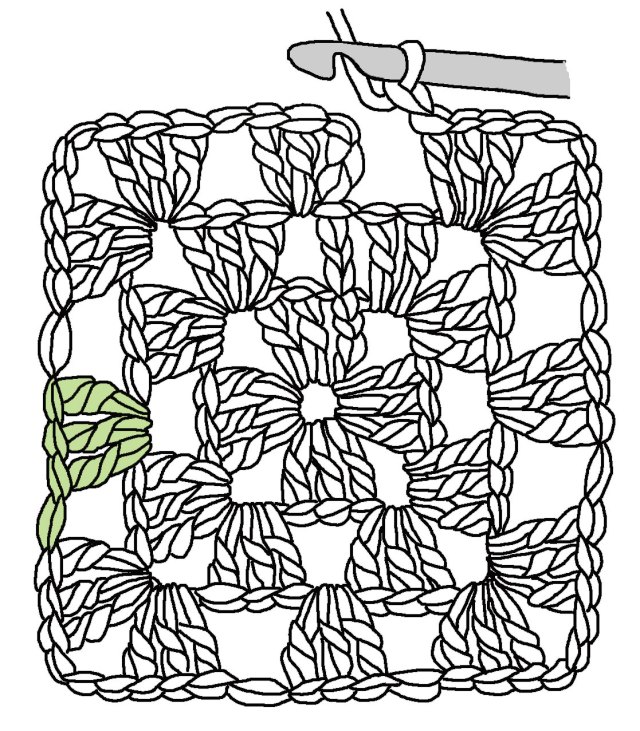
4) now, repeat from * around to beginning ch, join with ss to top of beginning ch (3rd ch of beginnging ch) – this join completes the first shell of round
you should have 12 shells = 36 tr (US dc) – 4 x 3-ch sps -8 x 1-ch sps


1) make 4 ch

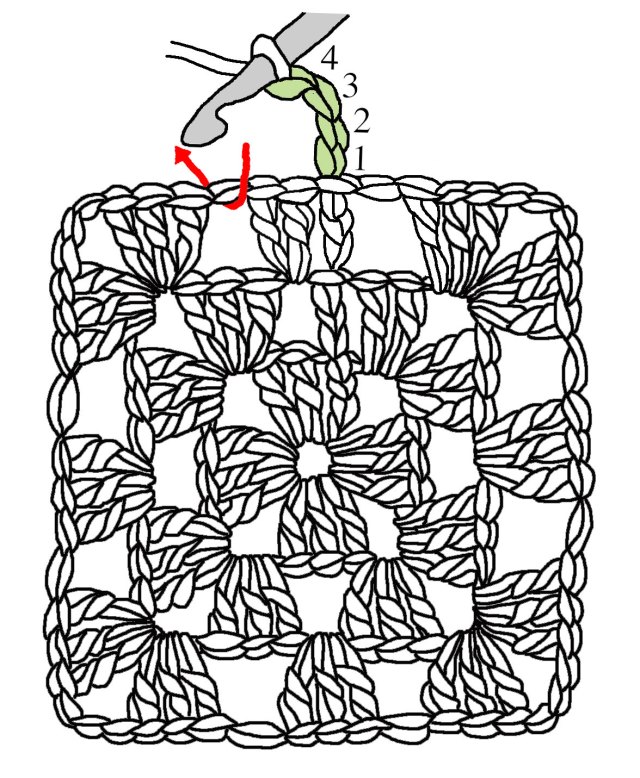
2) in the next 1-ch sp work (3 tr (US dc), 1 ch),

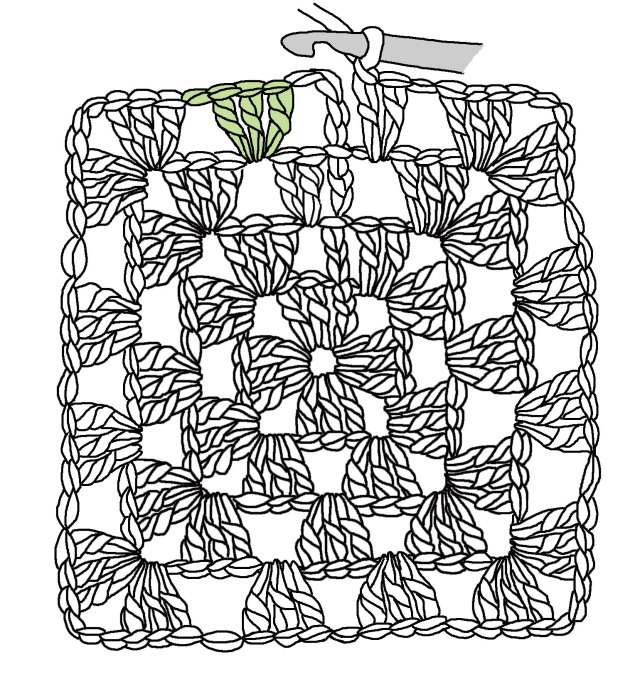
3) * in the next 3-ch sp work (3 tr (US dc), 3 ch, 3 tr (US dc), 1 ch),

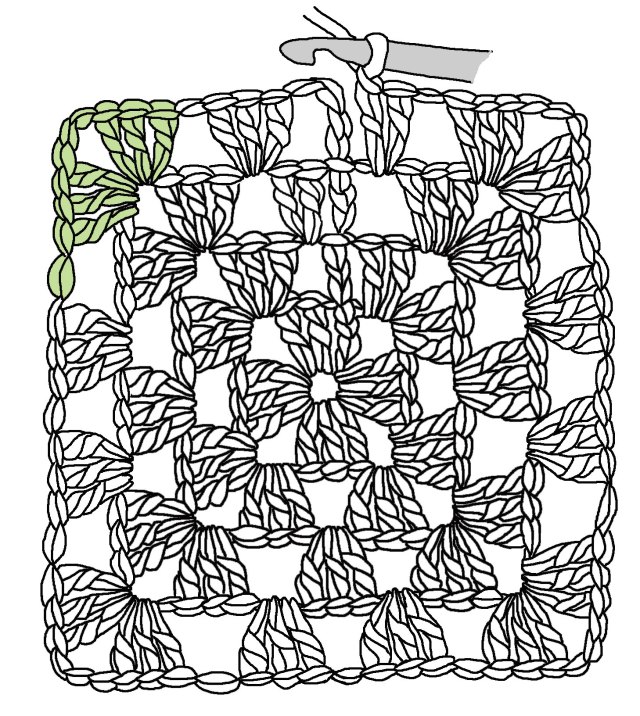
4) then in each next 1-ch sp work (3 tr (US dc), 1 ch), repeat from * around to last 1-ch sp,
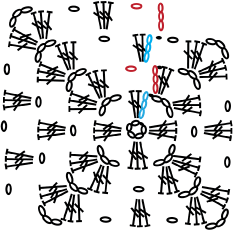

5) in last 1-ch sp work (2 tr (US dc))
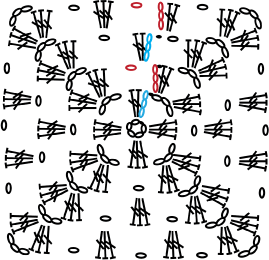

6) join with ss to 3rd ch of beginning ch – this join completes the last shell of round
you should have – 16 shells = 48 tr(US dc) – 4 x 3-ch sps – 12 x 1-ch sps


Rounds 3 & 4 are the repeat rounds, but you can finish off on any round or just keep going to any desired size
Adding colours to your Granny Square:
The following drawings shows colour changes on every round… however, how many rounds per colour you work is entirely up to you – experiment with these colour changes & amaze yourself with the creativity you may never have thought you had….
Basically you follow the above instructions except that you finish off each colour round before starting a new colour round
Tip: leave generous tail ends & wherever possible work over tail ends as you work
2) then, depending on the round, work as for one colour Gr/square instructions
Example No 1. Round 1:
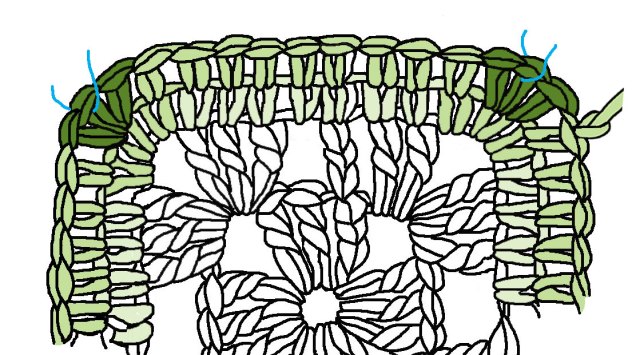
1a) after finishing your last round with a slip stitch do not finish off but continue with this last colour in use (working colour) & make 1 ch, & dc (US sc) in same stitch,


1b) now * work dc (US sc) in each 1-ch space & in each stitch across to next 3-ch space, work 3 dc (US sc) in 3-ch space, then repeat from * around & join with a slip stitch to the first dc (US sc) but do not finish off
Tip: I like to place a marker in the middle stitch of the 3 corner stitches for easy identification on the next round & I leave these markers in so that when it comes to joining my squares later I only have to match them corner marker to corner marker


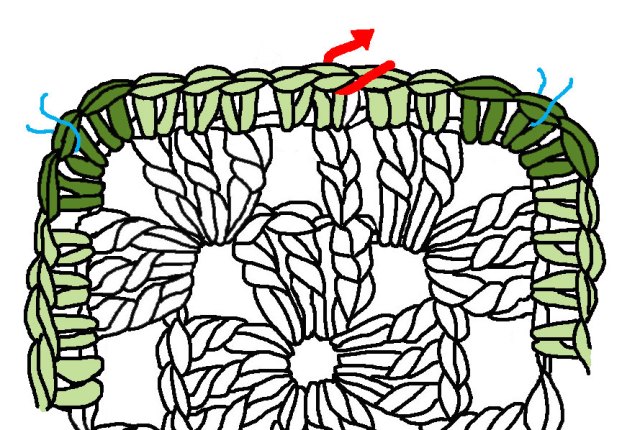
1c) make 1 ch, & dc (US sc) in same stitch,


1d) now * work dc (US sc) in each stitch across to next middle corner stitch, work 3 dc (US sc) in middle corner stitch, then repeat from * around & join with a slip stitch to the first dc (US sc) & finish off
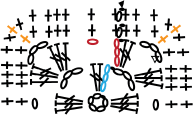
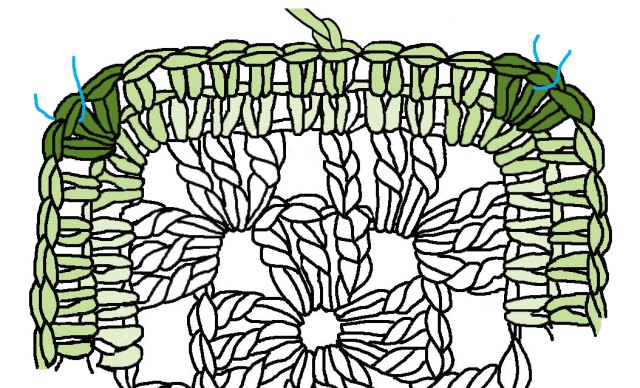

2a) finish off your last colour of square & bring in your new colour with a dc (US sc) in any corner 3-ch space, work 2 dc in same space (this makes your first 3-corner stitches)
Tip: joining with a dc (US sc) – start with the slip knot on hook, insert hook into space indicated by pattern & draw up a loop (2 loops on hook), YO & draw through both loops on hook (this counts as the first dc (US sc)) then continue as pattern instruction

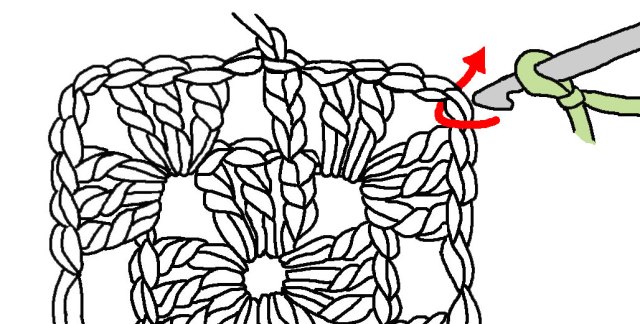
2b) now * work dc (US sc) in each stitch & in each 1-ch space across to next 3-ch space, work 3 dc (US sc) in 3-ch space, then repeat from * around & join with a slip stitch to the first dc (US sc) but do not finish off
Tip: I like to place a marker in the middle stitch of the 3 corner stitches for easy identification on the next round & I leave these markers in so that when it comes to joining my squares later I only have to match them corner marker to corner marker


2c) make 1 ch, & dc (US sc) in same stitch,


2d) now * work dc (US sc) in each stitch across to next middle corner stitch, work 3 dc (US sc) in middle corner stitch, then repeat from * around & join with a slip stitch to the first dc (US sc) & finish off

The instructions are in written form & I have also included stitch drawings & stitch diagrams (for those of you who would like to learn how to read pattern graphs)…..
For your first attempts I recommend working in a light coloured 8 ply (US worsted) yarn & using the hook size you are comfortable with – 4.50 (US 6/G) or 5.00 (US 8/H)
Stitch Diagram Symbols
One Colour Granny Square: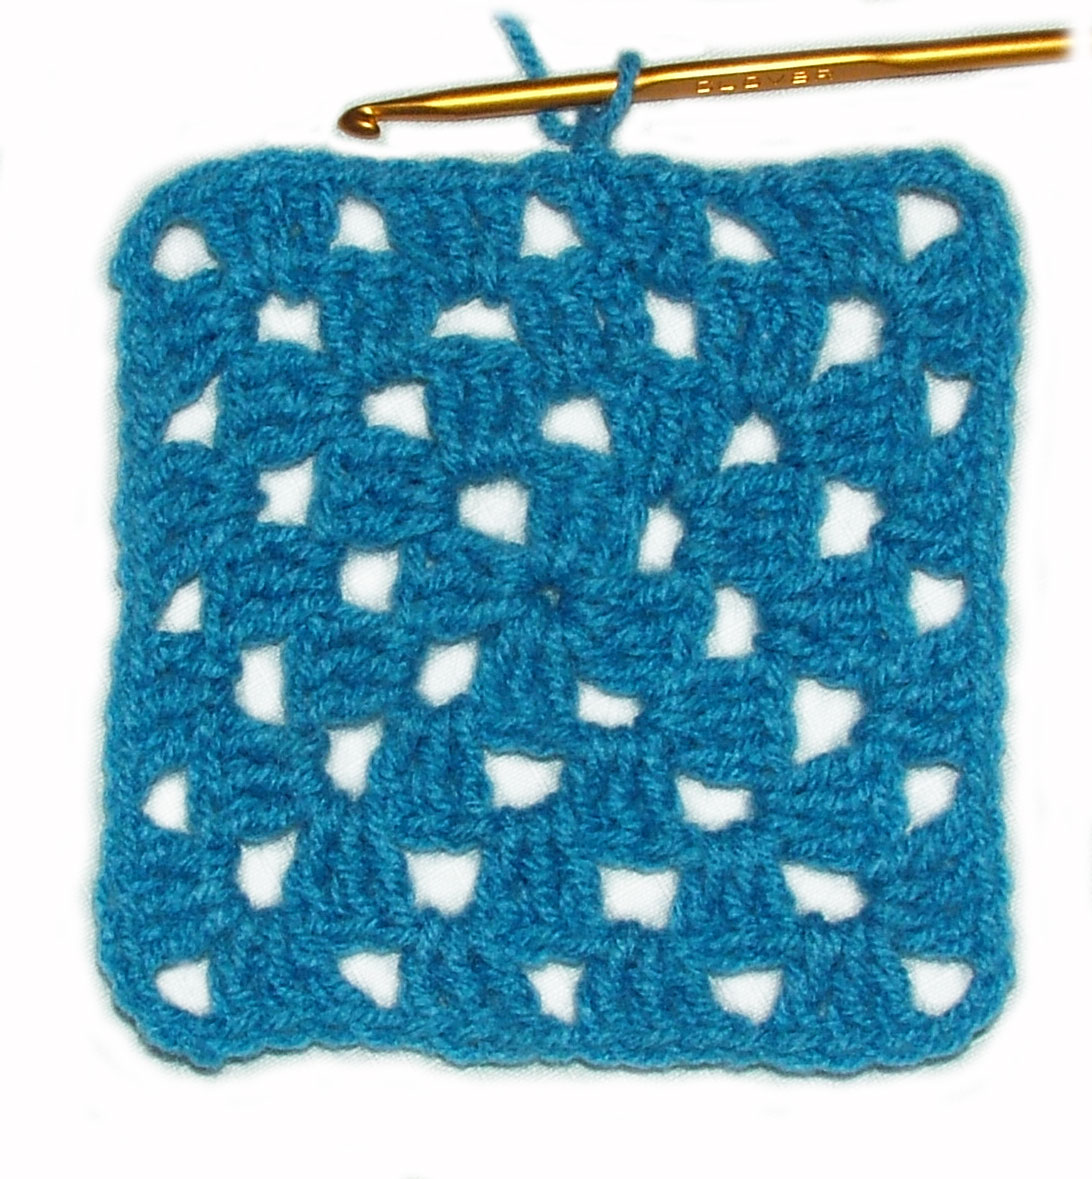
Foundation Ring:begin by making 5 chains (ch), join with a slip stitch (ss) to the 5th ch from hook to form a ring,

Round 1:
1) make 3 ch ((beginning ch) count this 3 ch as your first tr (US dc) of this round & throughout the entire pattern) & for this round you will be working into the ring
2) into ring work (2 tr (US dc), 3 ch) once,


3) then, continue working into ring, make (3 tr (US dc), 3 ch) three times,


4) join with ss into top of beginning ch (3rd ch of beginnging ch) – this join completes the first shell of round.
you should have - 4 shells = 12 tr (US dc) & 4 x 3-ch spaces (sps)


~~~~~~~~~~~~
Round 2:1) make 4 ch ((beginning ch) count this 4 ch as your first tr (US dc) plus 1 ch of this round & throughout the entire pattern)

2) then * in the next 3-ch sp work (3 tr (US dc), 3 ch, 3 tr(US dc), 1 ch), repeat from * around to last 3-ch sp,

3) in last 3-ch sp work (3tr (US dc), 3 ch, 2 tr (US dc))

4) join with ss to 3rd ch of beginning ch – this join completes the last shell of round
you should have – 8 shells = 24 tr (US dc) – 4 x 3-ch sps – 4 x 1-ch sps

~~~~~~~~~~~~
Round 3:1) make 3 ch, then into same sp work (2 tr (US dc), 1 ch), you have made the first shell of this round


2) in next corner sp work * (3 tr, 3 ch, 3 tr, 1 ch),

3) in next 1-ch sp work (3 tr, 1 ch),

4) now, repeat from * around to beginning ch, join with ss to top of beginning ch (3rd ch of beginnging ch) – this join completes the first shell of round
you should have 12 shells = 36 tr (US dc) – 4 x 3-ch sps -8 x 1-ch sps

~~~~~~~~~~~~
Round 4:1) make 4 ch
2) in the next 1-ch sp work (3 tr (US dc), 1 ch),

3) * in the next 3-ch sp work (3 tr (US dc), 3 ch, 3 tr (US dc), 1 ch),
4) then in each next 1-ch sp work (3 tr (US dc), 1 ch), repeat from * around to last 1-ch sp,
5) in last 1-ch sp work (2 tr (US dc))
6) join with ss to 3rd ch of beginning ch – this join completes the last shell of round
you should have – 16 shells = 48 tr(US dc) – 4 x 3-ch sps – 12 x 1-ch sps
Rounds 3 & 4 are the repeat rounds, but you can finish off on any round or just keep going to any desired size
~~~~~~~~~~~~~~~~~~~~~~~~~~~~~~~~~~~~~
Adding colours to your Granny Square: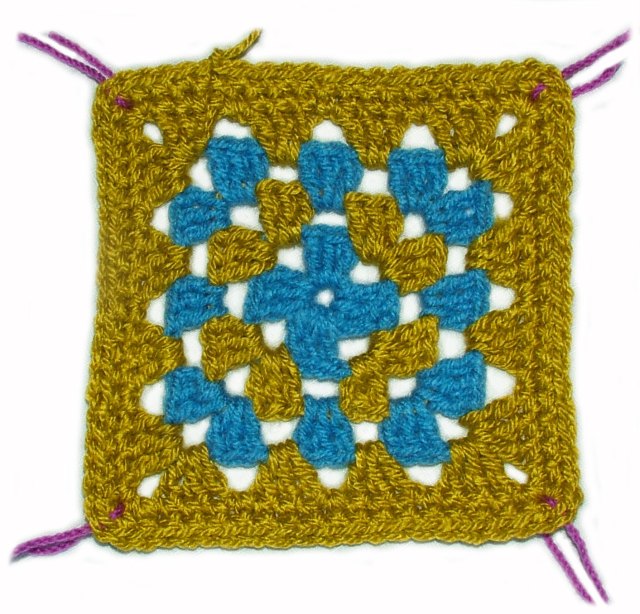
The following drawings shows colour changes on every round… however, how many rounds per colour you work is entirely up to you – experiment with these colour changes & amaze yourself with the creativity you may never have thought you had….Basically you follow the above instructions except that you finish off each colour round before starting a new colour round
~~~~~~~~~~~~
1) Bring in your new colour in any 3-ch sp with a slip stitch & make 3 ch ((beginning ch) count this 3 ch as your first tr (US dc) of this round & throughout the pattern), in the same space work (2tr (US dc), 3 ch, 3 tr (US dc)),Tip: leave generous tail ends & wherever possible work over tail ends as you work
2) then, depending on the round, work as for one colour Gr/square instructions
~~~~~~~~~~~~~~~~~~~~~~~~~~~~~~~~~~~~~
Edging your Granny Square: is entirely optional but personally, I prefer to work 2 rounds of dc (US sc) around each square mainly because the squares look more finished & they are so much easier to join into projects later – the main thing to remember when edging your square is to work your dc (US sc) stitch for stitch across to corner stitches & you must work 3 dc (US sc) in each corner stitch.
There are many variations, but the following the 2 methods are the ones I use most often for edging Granny Squares:Example No 1. Round 1:
1a) after finishing your last round with a slip stitch do not finish off but continue with this last colour in use (working colour) & make 1 ch, & dc (US sc) in same stitch,
1b) now * work dc (US sc) in each 1-ch space & in each stitch across to next 3-ch space, work 3 dc (US sc) in 3-ch space, then repeat from * around & join with a slip stitch to the first dc (US sc) but do not finish off
Tip: I like to place a marker in the middle stitch of the 3 corner stitches for easy identification on the next round & I leave these markers in so that when it comes to joining my squares later I only have to match them corner marker to corner marker
~~~~~~~~~~
Example No 1. Round 2:1c) make 1 ch, & dc (US sc) in same stitch,
1d) now * work dc (US sc) in each stitch across to next middle corner stitch, work 3 dc (US sc) in middle corner stitch, then repeat from * around & join with a slip stitch to the first dc (US sc) & finish off
~~~~~~~~~~~~~~~~~~~~~~~~~~~~~~~~~~~~~
Example No 2. Round 1:2a) finish off your last colour of square & bring in your new colour with a dc (US sc) in any corner 3-ch space, work 2 dc in same space (this makes your first 3-corner stitches)
Tip: joining with a dc (US sc) – start with the slip knot on hook, insert hook into space indicated by pattern & draw up a loop (2 loops on hook), YO & draw through both loops on hook (this counts as the first dc (US sc)) then continue as pattern instruction
2b) now * work dc (US sc) in each stitch & in each 1-ch space across to next 3-ch space, work 3 dc (US sc) in 3-ch space, then repeat from * around & join with a slip stitch to the first dc (US sc) but do not finish off
Tip: I like to place a marker in the middle stitch of the 3 corner stitches for easy identification on the next round & I leave these markers in so that when it comes to joining my squares later I only have to match them corner marker to corner marker
~~~~~~~~~~
Example No 2. Round 2:2c) make 1 ch, & dc (US sc) in same stitch,
2d) now * work dc (US sc) in each stitch across to next middle corner stitch, work 3 dc (US sc) in middle corner stitch, then repeat from * around & join with a slip stitch to the first dc (US sc) & finish off
~~~~~~~~~~~~~~~~~~~~~~~~~~~~~~~~~~~~~
Congratulations! you have completed your Granny Square… once you have made a few more you will need to join them & make what ever your heart desires – you will find a number of different ways of joining your squares on the Joining New Yarn, Fabric, Squares & Motifs page – enjoy!



I have always loved granny squares!
ReplyDeleteHi My problem is I don't know what size hook to use.. Got any suggestions for me? Thanks..
ReplyDelete