CLICK HERE FOR FREE BLOGGER TEMPLATES, LINK BUTTONS AND MORE! »

Wednesday, March 21, 2012

Your Love

There is nothing you have that is of any interest of God except your love.
It's impossible to love God as much as He loves us, because by His very nature, God is love. He doesn't have to try to love us. He can do nothing else. On the other hand, our love is fickle. We love when we feel like it, and that includes loving God. Yet we are commanded to love God. In fact, loving God is the most important instruction that Jesus ever gave (Mark 12:30).
Your love for God should not be halfhearted. You should commit yourself to it completely:with your heart (feeling), your soul (spirit), your mind (intellect), and your strength (action).
Loving God is a lifelong process that involves the entire being. Nothing should be held back. Is there some part of you that hasn't yet been given to God? Are you loving Him halfheartedly?
his is real love. It is not that we loved God,
but that he loved us and sent his Son
as a sacrifice to take away our sins.
1 JOHN 4:10

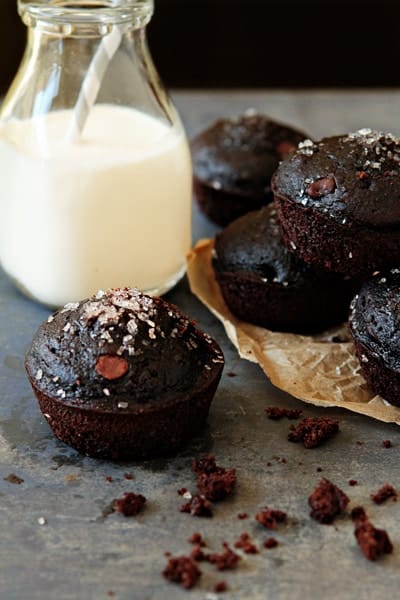
Chocolate/ Chocolate Chip Muffins..

Post image for Chocolate Muffins
Although I am not the biggest chocolate fanatic around, there are times (ladies, you know what I’m talking about) that I develop a seemingly insatiable craving for its delectable goodness.
When these urges occur, an ordinary chocolate chip cookie simply won’t cut it. I’ve come to terms with the idea that when these cravings hit, I’ve got to pull out all the stops. I’m talking chocolate ice cream with Homemade Hot Fudge Sauce, Symphony Brownies or these Chocolate Chocolate Chip Muffins.

I’m a little obsessed with muffins in general – they are my go-to breakfast for lazy Sunday mornings. In my opinion, there’s nothing better than a freshly baked muffin, fresh fruit and a cup of hot tea to welcome you to a new day. Chocolate Chocolate Chip Muffins? Ecstasy on my breakfast plate. You’re sure to have a good day when you start it out this way.
These delicious, dark chocolate muffins aren’t over the top sweet, so you won’t feel too guilty about indulging in one as a mid-morning snack. The addition of espresso takes the chocolate experience to whole different level while the semi-sweet chocolate chips offer a little texture and added sweetness.
If you like a little crunch in your breakfast, add some walnuts, sunflower seeds or pecans. They’d all be a wonderful addition to an already pretty phenomenal breakfast experience.
I’m thinking they’d be pretty great on your Easter brunch table too.


Yield: 12 muffins
Prep Time: 15 minutes
Cook Time: 20 minutes

Ingredients:

1 3/4 cups all-purpose flour
2 teaspoons baking powder
1/2 teaspoon baking soda
3 tablespoons dark unsweetened cocoa powder (Hershey’s Special Dark)
3/4 cup sugar
3/4 cup semisweet chocolate chips, plus 1/4 cup for sprinkling
1 cup milk
1/3 cup vegetable oil
1 large egg, lightly beaten
2 teaspoons instant espresso granules dissolved in 2 teaspoons hot water
1 teaspoon pure vanilla extract

Directions:

1. Preheat the oven to 400 degrees F. Lightly grease a standard muffin tin, or line with 12 paper muffin cups.
2. In a large bowl, combine the flour, baking powder, baking soda, cocoa, sugar, and 3/4 cup of the chocolate chips.
3. In a medium bowl, combine the milk, oil, egg, dissolved espresso granules, and vanilla; whisk to combine.
4. Add the wet ingredients to the dry ingredients and stir until just combined. Batter may be slightly lumpy – that’s okay.
5. Divide the batter between the prepared muffin wells. Sprinkle the remaining 1/4 cup chocolate chips on top of the muffins.
6. Bake in preheated oven for 18-20 minutes or until the muffins are dark, risen and springy.

Notes:

- I sprinkled the tops of my muffins with a little coarse sugar for added sparkle and texture.
- The muffins are best served the day they are made, but will keep in an airtight container at room temperature for about 1 day.
- If you don't have dark cocoa powder, you can substitute regular unsweetened cocoa powder.
- If you don't have instant espresso granules, you can simply omit this ingredient.

Chocolate Muffins

http://www.mybakingaddiction.com/chocolate-muffins/

Tuesday, March 20, 2012

Apron

Hello family and friends.. I just finished this apron its from a new pattern.. There are a few things on here I will change. I finished it up this morning..Couldn't find the hanger I use to display my aprons so I had to hang it on the door.... The pattern says fits most.. I'm selling this $15.00 that is with shipping.. So if your interested please let me know.. Have a great day God Bless

Spring Cupcake with cookie toppers..


Sunday, April 11, 2010


Spring Cupcakes with Cookie Toppers

Last month, when I made some fun lollipop cookies as cupcake toppers for my daughter's candy party I started thinking of all the other cute mini cookies I could make for cupcake toppers all year round.  Since we're right in the middle of spring here in California, I thought some little flowers would be the perfect way to celebrate the season. 


 I've had lots of questions as to how I made the little lollipop toppers, so I'll start with a little how-to.

First, prepare the cookie dough then chill and roll out the dough (recipe and instructions HERE).
It is important that the dough is nice and cool and firm.
For the lollipop cookies I used a 1 1/2 inch circle (from this set).  For the flower shapes, I used cutters from the Wilton Easter 12pc Mini Metal Cookie Cutter Set.

When I'm making mini cookies to use as cupcake toppers, I use Wilton(R) 4 Inch Lollipop Sticks (also available at Michael's and Hobby Lobby).   

Once you have your dough chilled, rolled out and have cut your shapes...


Turn the cookies back over, and bake right side up at 350*F until the are just beginning to take on a golden tone.  These smaller cookies usually take about 8-9 minutes. 

Transfer to a cooling rack, and as soon as they are cool they are ready to decorate. 
These cookies also keep very well, so you can bake them one day, then keep them covered (on a plate covered with plastic wrap, or in a large Ziplock type bag) for a couple days before you decorate them. 

Anatomy of a cookie decorating table

Once you're ready to decorate, prepare Royal Icing (recipe below). 

Royal Icing Recipe

4 Tablespoons Meringue Powder (I use Wilton Brand)
4 cups (about 1 pound) powdered sugar
6 Tablespoons warm water

Beat all ingredients until stiff peaks form.
*Make sure all bowls and utensils are totally grease-free or your icing will never reach proper consistency.
Spoon some of the thick white icing into individual bowls and add coloring (I use

For these simple cookies, I used the same consistency icing to outline and flood the cookies.  This allows me to only make one bag of each color of icing.

Gather supplies and prepare a work area (as pictured above).


Using a #2 or #3 size tip, outline your cookie with icing.  If you're outlining a very detailed shape, you may need to use a thicker consistency of icing (so the icing doesn't just run off the cookie, or lose the shape you want).  But if you're doing a simple shape, you can use the same icing to outline and flood (a medium-thin consistency).


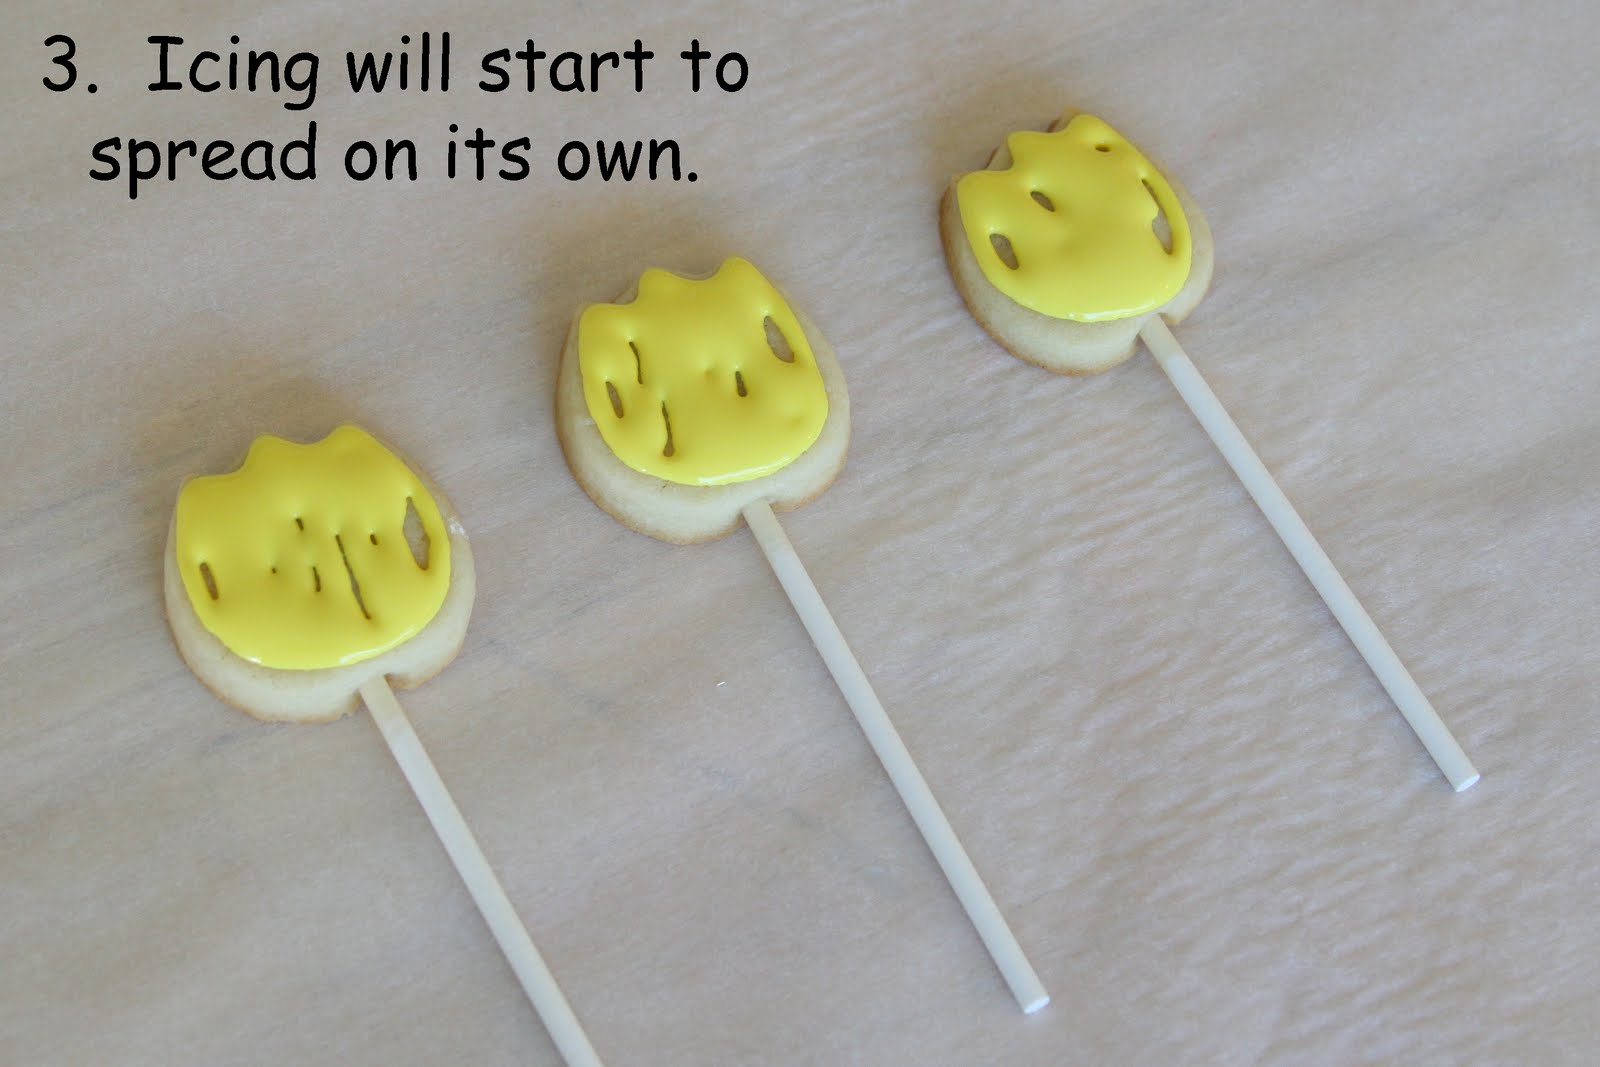
After outlining, (immediately) go back and "flood" the cookie with a medium-thin consistency icing.  Pipe the flood icing back and forth inside the shape of your outline.  As you can see (below) it doesn't have to be perfect.  The icing will begin to fill in on it's own, and then you can use a toothpick to guide the icing to any unfilled areas.


For these cookies, I wanted to create a two toned effect, like some varieties of real-life tulips.  You could skip this step and have single color cookies. 
For other cookie designs, this would be the time to use of another color of flood consistency icing and add little drops onto the cookie, creating perfect polka-dots. 
This technique is call "wet on wet".


Set the cookie on a tray to dry.  Depending on the temperature and humidity level in your home, the icing will take 2-12 hours to dry.  Do not attempt to wrap up the cookies until the icing is completely dry.  To speed up drying time a bit, set up a fan to gently blow on the cookies. 

Once the icing is dry, add a ribbon around the stick (if you like), and insert into frosted cupcakes. 


It's a cookie and a cupcake... what more could you want in life?  Well, what more could you want in a treat at least?
 

For the centers of the daisy shapes I added a mini M&M when the icing was still wet (and before I sprinkled on the the sanding sugar).


Happy Spring
and
Happy Baking!

Make Manure Tea

If you’re growing your own food you need your plot to be as fertile as possible.  Manure is the small-holders best tool for improving fertility quickly.  If you have a supply of manure then making up some manure tea or manure water is a quick way of ensuring plants have a soluble supply of all the nutrients they require.

Make Manure Tea / Manure Water

  • Fill a bucket 1/3 full of manure.
  • Fill up with water and put on a not too tight lid.
  • Leave the manure water for two weeks to ferment and allow nutrients to dissolve.
  • Dissolve the manure tea with ten times as much water and use.  The brew applied to plants should look the colour of week tea.
  • Keep topping up the manure water bucket with more water as you use it to ensure a continual supply.
This is a great ‘pick me up’ or reviver for plants which have gone through ‘troubled times’ such as club root or bad weather.  It is also useful to apply as crops first start cropping as a booster feed.  We use it on tomatoes, aubergines and peppers until fruit starts to set.
In the long term a self sufficient gardener would be looking to improve the soil en-mass with regular compost and manure applications so this ad-hoc feed would be rarely needed.  But as you start to improve your soil’s fertility this quick-fix solution can be invaluable.
To make compost water or seaweed tea use exactly the same method described above.  You will need to rinse some of the salt from your seaweed haul before making the seaweed tea.  Seaweed tea is probably the best as seaweed seems to contain every nutrient a plant could want.  But as ever, use whatever you can get your hands on.
manure-tea
Basically you’re making your own liquid fertilizer which can even be used as a foliar feed (though not on the bits you want to eat any time soon).  Even if you were buying or bartering in manure this is a very cheap way of making liquid feeds which are ecologically sound too due to the absence of chemicals.  And, if you’re using compost or manure produced on your own vegetable plot, or seaweed picked locally yourself, this is a free organic liquid feed.  You can’t get better than that.
For a more self sufficient future
If you find our site helpful why not make your Amazon purchases through our US link or our UK Amazon links? It costs you nothing more and means we can buy a new pair of Boots!
http://www.aselfsufficientlife.com/manure-tea-best-natural-fertilizer.html


Don't Neglect Your Life


Anything within the scope of your responsibility will decay without your attention.
There's a great principle of the natural world everyone needs to know. It's called the Law of Entropy, and it goes like this :Over time, things naturally lose energy, decay, or move from order to disorder. To illustrate this principle, picture your desk. From time to time you clean your desk, and the reason you clean it repeatedly is because it doesn't stay clean. It moves from order (neat) to disorder (cluttered) for reasons no one really knows.
There are many more examples we could use (garages closets, cars, hair), but let's focus on the some of the intangible things of your life, things like character and integrity. If you leave these areas alone and fail to give them attention, they will lose energy, decay, and move from order to disorder. In fact, anything that requires your time and energy-such as your relationship with God will go backward if you neglect it.
you must warn each other every day
so that none of you will be deceived by sin.
HEBREWS 3:13

Monday, March 19, 2012

Colombian Empanadas

Colombian Empanadas


Do you spin? Do you go to spinning class?
Today is the first day I’m attending a spin class in four years. Four years!! Four years ago a spinning class scarred me…literally.
It all started when I was trying to lose 5 pounds, which I feel is the sentence that gets me in the most trouble…
My friend invited me to join her take a class at her fancy gym. You know, those LA gyms that sorta feel like a club, where girls are just wearing sports bras, and dudes are super muscle-y and stare at themselves in the mirror as they work out. Gross. Yeah, one of those gyms…

First of all, what they don’t tell you is that you need the right shoes. Shoes and spinning go hand in hand. You need those I’m-on-a-stationary-bicycle-shoes that clip in. You know what I’m talking about? The shoe situation was the root of my problem that evening.
Okay, so I entered the class. The room was dimly lit, just black light. Techno music was thumping. Everyone was half-naked. You know, just the usual gym class.
The dude that was conducting the class was wearing one of those Madonna-head-piece-microphones. He liked Madonna a lot, I think.
So we started…spinning. First it was like the warm-up, a lot “up-hill,” with inspirational talk about reaching the mountain or something. I dunno. This is another topic of conversation, but don’t get all cheesy on me as I’m sweating. I don’t want to be preached to about life, or whatever, at a spin class, OK?!

Then it really started. We went faster…and faster…and fast.
As I looked around the room, nothing but skinny, model-y girls totally killing it. Like, they do this all the time, clearly. So there I was, spinning as fast as I could, trying to keep up. And guess what? I was keeping up. I was killing it–I was totally proud of myself.
This is a good time to mention that there are apparently brakes on stationary bicycles? I did not know this. Nope. Didn’t know.

So, there I am, spinning away…super fast. Like a pro, really feeling legit, like I belonged. And then…omg…and then…my not-spinning-shoes slipped out of the shoe socket and the momentum lunged me forward, throwing my body practically over the bicycle handlebars.
People stared. Actually, everyone stared. And then the music lowered and I hear over the loudspeaker, “Everyone keep going. She’s fine.” The instructor was talking about me, if you didn’t know. ME!!
He jumped off of his bicycle, ran to my aid and mouthed, “ARE-YOU-OKAY?” Totally mortified, I nodded like a lot. I was fine. It was cool. Stop staring, everyone. Thanks. Come again.
But I wasn’t fine. My leg hurt really really really bad, but I was too shy to get up and leave. My leg had hit the water bottle holder and a piece of plastic sliced my thigh open. “Sliced” might be a tad bit of a dramatic word–but it hurt and there was blood and I was hurting, OK? But I couldn’t see my leg because it was dark in there and I guess blood doesn’t glow in the dark under a black light.
When I left class I looked down and was whoa. This might be the most embarrassing thing to ever happen to me. I fell off of a bike THAT WASN’T MOVING! And now I’m bleeding…from a stationary bicycle.
This is basically the gym version of hitting a parked car. Which I have also done, actually, but I’ll save that for next time…

Let’s talk empanadas. Specifically, Colombian empanadas.
I was totally inspired to make these when I saw Kelsey and Nicole make their versions of Argentinian empanadas.
Basically, Colombian empanadas are made with a corn-based dough and fried; versus Argentinian (and Cuban, Puerto Rican, etc.) empanadas which are made from a traditional pastry dough and baked.
The dough is drastically different; the filling nearly the same. The filling is called “picadillo.” And about every country in South America has their own way of making it. Some put olives, hard boiled egg, raisins, fried cubed potatoes…the list could go on…
This is a combination of ground beef, some spices, tomato, aromatics and mashed potato. I love the filling so much that I like to eat it with just rice. Delicious.
The dough isn’t hard. It’s just Masa flour (a.k.a. corn flour) mixed with water, a little olive oil and salt. You divide the dough into balls and roll it out in between two pieces of plastic wrap.
Fill the empanadas, crimp the edges and fry. Not going to lie, the process is a little time consuming, but definitely not hard. And very worth it.
Let’s hope I don’t fall of the bike today. If I do I know what I’m making again…

Colombian Empanadas
Print this recipe!
Dough:
2 3/4 cups yellow corn flour, 2 tablespoons
3 cups warm water
1/2 tablespoons olive oil
1/2 teaspoon kosher salt
Filling:
1 medium russett potato, peeled and diced
Olive Oil
1/4 yellow onion, diced
1/4 red bell pepper, diced
2 garlic cloves, minced
2 1/2 tablespoons tomato paste
1/2 teaspoon ground cumin
1/4 teaspoon ground paprika
1/4 teaspoons crushed red pepper
12 ounces ground sirloin, lean
1 teaspoon kosher salt
1. In a medium bowl, add corn flour, warm water, olive oil and salt. Mix until dough forms a ball. If dough is still wet, add a tablespoon of corn flour at a time until the mixture comes together. Wrap with plastic wrap and allow to rest on the counter for 20 minutes.
2. Meanwhile, bring a small pot of water to a boil. Add the diced potato and cook until tender, about 5-7 minutes. When done, transfer to a colander to drain. Mash the potato lightly with a fork and set aside.
3. In a medium skillet, over medium heat, add a tablespoon of olive oil. Add onions and cook until translucent, 5-7 minutes. Add red bell pepper and cook for an additional 2 minutes. Place minced garlic atop vegetable mixture and cook for an additional minute. Add tomato paste, cumin, crushed red pepper, salt and mix.
3. To the skillet, add the ground beef, breaking it up with a wooden spoon. Cook until the meat browns, mixing it regularly, about 7 minutes. Transfer mixture to a bowl and add the mashed potato. Mix until combined and salt to taste.
4. Alright! Now it’s time to roll out the dough. Scoop 1 1/2 tablespoons of dough onto your palm and roll into a smooth ball. Place the ball in between two pieces of plastic wrap and gently press into a circle using a rolling pin. Place a heaping teaspoon or two on one half of the dough circle. Using the bottom plastic wrap, lift and fold the dough over, creating a half moon shape. Repeat process until you’ve gone through all of the dough. Using the tines of a fork, crimp the edges tightly.
5. In a cast iron skillet (or medium pot), add enough vegetable oil until it reaches about 3 inches, and heat until a thermometer reaches 350F. If you don’t have a thermometer, not that big of a deal–add a tiny bit of scraped dough and if it sizzles, it’s ready for the empanadas. Carefully add three empanadas at a time, being sure to not overcrowd the pan.
Simple lil’ salsa
3 Roma tomatoes, de-seeded
1/4 cup white onion, diced
1 serrano pepper, de-seeded and diced
2 tablespoons cilantro
2 teaspoons lime juice
1/2 teaspoon salt
1. Place all ingredients in a food processor and pulse until combined.
Yields 20 Empanadas


http://acozykitchen.com/colombian-empanadas/